
A garage door weather seal — the rubber strips along the bottom, sides, and top of the door — fails quietly until it fails completely. In Kansas City, the freeze-thaw cycle that runs 25–35 times every winter degrades rubber and vinyl faster than in most US markets. When a seal goes, you get water on the garage floor, cold drafts at foot level, insects entering in summer, and higher energy costs in an attached garage. This guide covers what fails, when, and what to do about it. The four sealing zones on a residential garage door are: the bottom seal (the most common failure point — rubber or vinyl strip in a T-slot or bead channel along the bottom panel), the side stop molding (attached to the door frame on each side), the top stop (along the header above the door), and the threshold seal (a separate rubber strip on the garage floor that the door lands on). Most bottom seals show visible failure — cracking, hardening, visible light gaps when the door is closed, or water on the floor after a rain — before full seal loss. Garage Door Masters KC handles weather seal replacement across the KC metro. $79 service call, same-day scheduling, bonded and insured.
Why weather seals fail faster in Kansas City than in most US cities
Kansas City sits in one of the most demanding climate zones for garage door hardware. The metro averages 25–35 freeze-thaw cycles per winter — days when temperatures cross the 32°F threshold in both directions. Each cycle creates mechanical stress on rubber and vinyl: the material expands when it freezes, contracts when it thaws, and cracks develop along the highest-flex points. After repeated freeze-thaw cycles over just a few Kansas City winters, even high-quality seals show significant degradation.
Compound that with KC's summer extremes. July and August temperatures regularly reach 93–97°F, and a south- or west-facing garage door can see surface temperatures well above ambient — ultraviolet radiation and heat accelerate the oxidation of rubber compounds and make vinyl brittle. A seal that survived the last winter may crack through its first hot summer.
The practical result: KC garage door weather seals have a shorter useful life than the national average. A seal that might last 8–10 years in a temperate climate lasts 4–7 in Kansas City. Homeowners who notice their garage is getting harder to keep warm in winter, or who start seeing water on the garage floor after heavy rain, are usually dealing with seal failure — not a door or frame problem.

The four weather-sealing zones on a sectional garage door
Understanding which seal is failing tells you what repair is needed. Sectional doors have four distinct sealing zones:
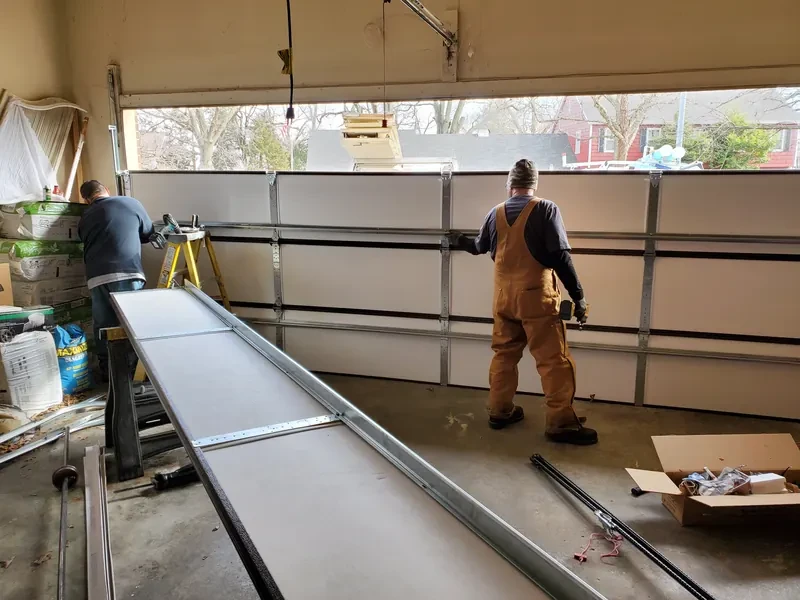
1. Bottom seal (the highest-wear zone)
The bottom seal attaches to the bottom panel of the door and compresses against the floor (or a threshold strip) every time the door closes. It takes the most abuse: mechanical friction on every cycle, abrasion from concrete, impact from ice and snow pushed against it by the door, and UV exposure on the exterior face. This is the seal that fails first in virtually every KC garage and the one most commonly replaced.
Standard bottom seals slide into an aluminum retainer channel riveted to the bottom panel. The retainer channel profile varies — T-slot, single-bead, and double-bead are the most common — and replacement seals must match the channel profile exactly. Mismatched profiles sit improperly, leave gaps, and tear within weeks.
2. Side stop weatherstripping (left and right jamb seals)
Side stop weatherstripping runs vertically along both jambs (the framing on either side of the garage door opening). It seals the gap between the door's side edge and the door frame when the door is closed. These seals see less mechanical wear than the bottom seal but degrade from UV exposure and compression set (the rubber permanently compresses in the closed position over years). Side stop failure shows up as drafts along the door's vertical edges and visible daylight on the sides of the closed door.
Side stop replacement is more involved than bottom seal replacement because the stops themselves are nailed or screwed to the frame, and the door must be adjusted to close firmly against them. A door that has settled, shifted on its tracks, or had cable tension changes may need a stop adjustment alongside new weatherstripping to seal correctly.
3. Top stop (header seal)
The top stop seals across the top of the door opening where the door meets the header. It sees the least wear of the four zones (no mechanical abrasion, less UV exposure) and is usually the last to fail. When it does go, the failure is typically visible as a gap of daylight or cold air along the top of the door. Header seal failure is uncommon enough that it is usually discovered during a general weather-sealing inspection rather than reported as the primary complaint.
4. Floor threshold strip
The floor threshold is not part of the door itself — it is a rubber or vinyl strip adhered or mechanically fastened to the garage floor inside the door opening. The door's bottom seal contacts the threshold as the door closes, creating a tighter seal than bottom-seal-to-concrete alone. Threshold strips are especially valuable in garages where the concrete apron has cracked, settled, or slopes toward the door — conditions common in older KC homes — because they compensate for floor irregularities that a door-mounted bottom seal cannot bridge.
Six signs your garage door weather seal needs replacing
In Kansas City, these are the clearest indicators that a seal is compromised:
- Water on the garage floor after rain. A puddle or wet arc along the bottom of the closed door — even if the rest of the garage floor is dry — points to bottom seal failure. The water wicks under the door at the gaps and pools immediately inside.
- Daylight visible under or around the closed door. Stand inside the garage with the lights off on a bright day. Any light visible around the door perimeter means the seal is not contacting the frame or floor at that point. A flashlight aimed at the gap from outside at night shows the same thing.
- Cold drafts at floor level in winter. If your garage feels noticeably colder than it should relative to the outdoor temperature — particularly at foot level — a failed bottom or side seal is the most common cause. In attached KC garages, this draft transfers directly to the adjoining living space through the garage-to-house door.
- Insects entering along the door perimeter. A compromised side or top seal creates an entry point for spiders, crickets, and other insects common to KC's summer months. The gap is often too small to see easily but large enough for insects to pass through.
- The rubber strip is visibly cracked, brittle, or torn. Look at the bottom seal from outside when the door is closed. Cracking along the seal's length, missing sections, or sections that are no longer contacting the floor uniformly are visible signs of wear.
- Increased energy costs in winter. An attached garage with a failed weather seal acts as a cold-air chamber that the house thermostat must compensate for. If your heating costs increase noticeably in January–February, a compromised garage door seal is one of the first things to check — it is an inexpensive fix relative to the heating cost impact.
Bottom seal types: which one fits your KC garage door
Not all bottom seals are interchangeable. The retainer channel profile on the bottom panel determines which seal type you need. The most common profiles in KC residential doors:
T-slot seal (most common on doors installed post-2000)
The T-slot retainer has a T-shaped channel. The seal has a matching T-shaped bead that slides into the channel from the side. T-slot seals are the standard on most sectional doors manufactured in the past 25 years and are the most widely available replacement at hardware stores. If you are unsure which type you have, look at the retainer channel from the front — a T-slot profile has a squared-off groove rather than a rounded one.
Bead-style seal (common on older doors)
Single-bead and double-bead retainers are common on doors manufactured in the 1980s and 1990s. The seal has a round or oval bead that snaps into a matching rounded groove. Single-bead seals fit single-groove retainers; double-bead seals fit dual-groove channels that hold the seal more firmly. Buying a T-seal for a bead retainer (or vice versa) is the most common DIY mistake — the profiles look similar in the package but do not seat properly in the wrong retainer type.
Nail-on vinyl weatherstrip (alternative for uneven floors)
On garages where the concrete floor is significantly uneven and a standard sliding-in seal leaves persistent gaps, a nail-on or screw-on vinyl weatherstrip can be attached directly to the bottom panel's exterior face. This type contacts the floor more flexibly than a retainer-channel seal and can bridge moderate floor irregularities. It is less common but useful in older KC homes where concrete settling has created an uneven floor-to-door seal surface.
EPDM rubber vs. standard vinyl: what lasts longer in KC's climate
Most budget bottom seals are PVC vinyl — inexpensive and functional when new, but stiffening and cracking after 3–5 KC winters. EPDM (ethylene propylene diene monomer) rubber seals cost moderately more but are specifically formulated for outdoor UV exposure, temperature cycling, and freeze conditions. In KC's climate, the extra cost is worth it: EPDM seals maintain flexibility down to -40°F (well below any temperature KC winters produce) and resist summer UV degradation far better than vinyl. When we replace bottom seals on a service call, we install EPDM-grade rubber rather than standard vinyl for exactly this reason.
DIY vs. professional replacement: where the line is for KC homeowners
Call a professional when:
- The retainer channel itself is bent, corroded, or loose — a damaged retainer cannot hold any seal properly and needs replacement before a new seal will help.
- Water intrusion persists after a DIY seal replacement — usually signals a floor-level issue (settlement, slope) or a door-level problem (cable tension, track alignment) that a new seal alone cannot fix.
- Side or top stop weatherstripping needs replacing — these involve the door stops themselves and require adjustment to the door's closing position, which requires track and cable knowledge to do correctly.
- The door is visibly bowed on the bottom panel — a bowed panel does not contact the floor uniformly and may need panel replacement rather than just a seal.
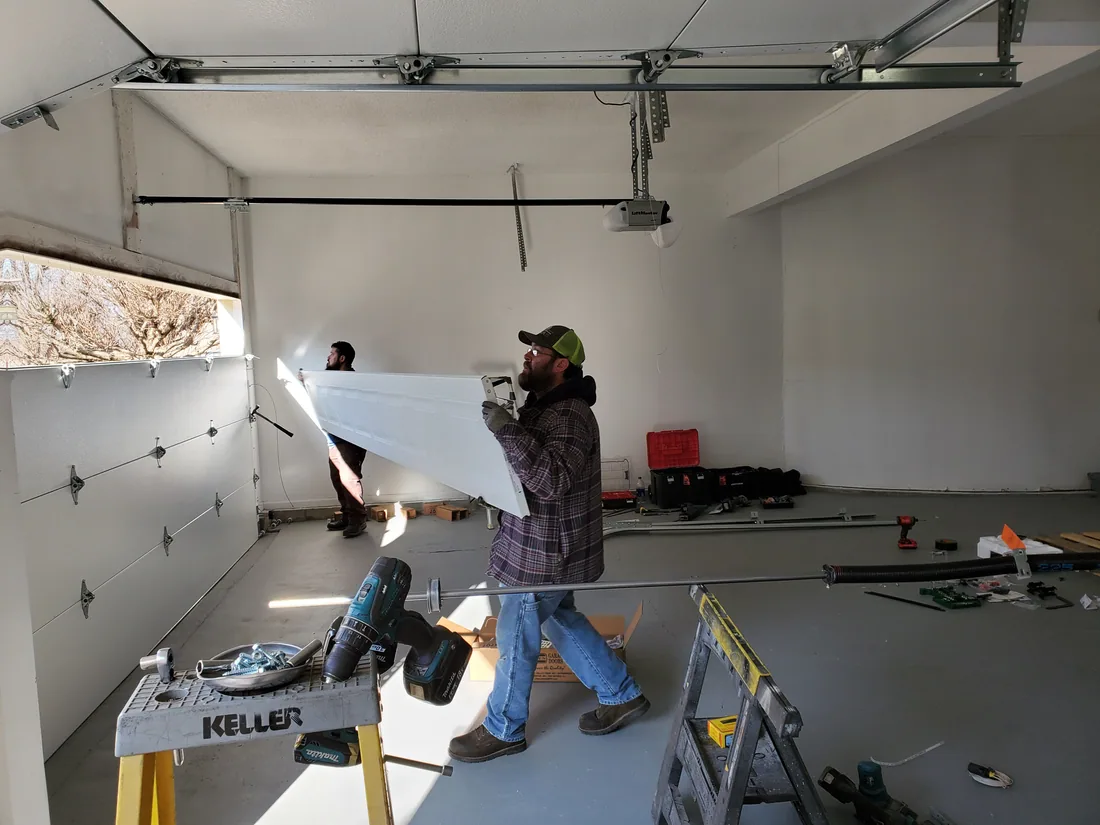
A professional service call covers diagnosis across all four sealing zones, not just the bottom seal, and often catches related issues (cable wear, track alignment, spring tension) that contribute to sealing problems. In KC's climate, where a failed seal often means water in the garage during spring thaw or cold drafts throughout the winter heating season, the $79 service call is a low-cost way to get a full assessment rather than guessing at the cause.
How a weather seal service call works
When we come out for a weather-sealing issue, here is what we do:
- Inspect all four zones — bottom seal, side stops, top stop, and floor threshold — from inside and outside the closed door.
- Check door level and cable tension — a door that is not level contacts the floor unevenly and creates gaps that no seal can fully close. Cable tension affects how evenly the bottom of the door lands on the floor. Both are checked before replacing any seal.
- Assess the retainer channel — if it is in good condition, we slide out the old seal and install a new EPDM rubber seal matched to the channel profile. If the retainer is damaged, we replace it at the same visit.
- Check the floor threshold — if the floor is uneven or has settled, we recommend adding a rubber threshold strip to the floor to give the bottom seal a uniform surface to contact. This is a separate add-on, not always necessary.
- Quote in writing before doing any work — the $79 service call is credited toward the same-day repair cost. For most single-seal replacements, the total cost is modest and most KC homeowners opt to have us also address any related tune-up items found during the visit.
- Test before leaving — we close the door and check for light gaps, water simulation with a hose if needed, and confirm the seal is contacting uniformly across the full width.
Most weather seal service calls take 45–90 minutes. We carry common T-slot, bead, and vinyl seal types on the truck. Same-day service is available 7 days a week; 24/7 for emergencies where a failed seal is causing active water damage.
KC seasonal timing: the best windows for weather seal replacement
In Kansas City, the two best times to address weather sealing:
October–early November (fall): Before freeze-up. Replacing a seal in fall means it is in good condition for the January–February period when KC sees the most freeze-thaw stress on garage hardware. EPDM rubber installs best above 40°F — below that, rubber stiffens and is harder to slide into retainer channels. Pairing the inspection with a full seasonal maintenance check covers lubrication, spring tension, and balance in a single visit.
April–May (spring): After the worst of the freeze-thaw season. If a seal cracked during winter, spring is when homeowners notice it most — the first spring rains reveal water intrusion that dry winter conditions masked. Addressing it in April or May prepares the garage for summer insect and humidity season.
Emergency seal replacement is also available year-round. A bottom seal that is completely torn off — common after a vehicle impact or a severe ice storm where the door froze to the floor and was forced open — is a same-day repair. We keep common seal profiles on every truck.